Showing posts with label guide. Show all posts
Showing posts with label guide. Show all posts
Tuesday, November 15, 2016
How To Flash Update With Using PhoenixSuit Guide
How To Flash Update With Using PhoenixSuit Guide
How To Flash With PhoenixSuit
PhoenixSuit Friend Of LiveSuit.exe
(Both Working Perfect To Allwinner Chip)
Open Your PhoenixSuit Latest Version

Click To Firmware Tab & Select Your .IMG File
Now Connect Tablet To Boot Mode , After Its Auto Started

Now Click To Yes If You Want Full Update , No For Normal Update

Same Again Click To Yes If You Want Full Update , No For Normal Update

Tablet On Update

Update Done : Enjoy
PhoenixSuit Friend Of LiveSuit.exe
(Both Working Perfect To Allwinner Chip)
Open Your PhoenixSuit Latest Version
Click To Firmware Tab & Select Your .IMG File
Now Connect Tablet To Boot Mode , After Its Auto Started
Now Click To Yes If You Want Full Update , No For Normal Update
Same Again Click To Yes If You Want Full Update , No For Normal Update
Tablet On Update
Update Done : Enjoy
Go to link download

Monday, November 14, 2016
LG Flash Tool 2014 HOw To Using This Tool Guide Free Download
LG Flash Tool 2014 HOw To Using This Tool Guide Free Download
LG Flasher Tool 2014-The best way to Flash LG KDZ Rom Free Download

1. Version:
+ Build 25/06/2014 : Initial Version
+ Build 27/06/2014 : Fix not working with windows XP
+ Build 03/07/2014 : Fix not working with some machine run windows 8/8.1 64bit
2. Whats news:
+ This is a modified version of UpTestEX v1.2.3.1 and working with all LG Smartphone Models
+ Re-design GUI simpler.
+ Working without LG Mobile Support Tool installed !
+ Working with lastest version of LG Mobile Support Tool.
+ Dont need to use hosts file or run http server to bypass anymore !
+ Default language is set to English. Dont need to choose language any more !
3. Tutorial:
+ Download and setup LG Driver : Here
+ Download LG Flash Tool 2014 tool and extract :Here
+ Enter to Download Mode and plug USB into your PC
+ WARNING : Remember copy KDZ file into LG Flash Tool 2014 folder
+ Run LGFlashTool2014.exe and do as following pictures :
+ If you cannot run LGFlashTool2014.exe, please install Visual C++ Runtime Library :Here
Normal Flash: Flash ROM without losing any data. Only use this when you need to fix system error. Beware of boot loop when flashing ROM that differ from current ROM on your phone or MOD ROM.
CSE Flash: Choose this option when you need a fresh format. All data will be gone. Its suitable for upgrading or downgrading ROM or simply use this when you need to back to Stock.
+ Build 25/06/2014 : Initial Version
+ Build 27/06/2014 : Fix not working with windows XP
+ Build 03/07/2014 : Fix not working with some machine run windows 8/8.1 64bit
2. Whats news:
+ This is a modified version of UpTestEX v1.2.3.1 and working with all LG Smartphone Models
+ Re-design GUI simpler.
+ Working without LG Mobile Support Tool installed !
+ Working with lastest version of LG Mobile Support Tool.
+ Dont need to use hosts file or run http server to bypass anymore !
+ Default language is set to English. Dont need to choose language any more !
3. Tutorial:
+ Download and setup LG Driver : Here
+ Download LG Flash Tool 2014 tool and extract :Here
+ Enter to Download Mode and plug USB into your PC
+ WARNING : Remember copy KDZ file into LG Flash Tool 2014 folder
+ Run LGFlashTool2014.exe and do as following pictures :
+ If you cannot run LGFlashTool2014.exe, please install Visual C++ Runtime Library :Here
Normal Flash: Flash ROM without losing any data. Only use this when you need to fix system error. Beware of boot loop when flashing ROM that differ from current ROM on your phone or MOD ROM.
CSE Flash: Choose this option when you need a fresh format. All data will be gone. Its suitable for upgrading or downgrading ROM or simply use this when you need to back to Stock.


No need to choose desired language, it automatically change to English as a default setting.

+ Wait until 100% to complete !
Lg Phone Firmware List
Lg Phone Firmware List
Go to link download
Monday, November 7, 2016
How to disable OTA upgrades LG G3 TMO D851 Guide
How to disable OTA upgrades LG G3 TMO D851 Guide
Hit the "show content" button below for a FAQ, info on how to disable OTAs, backing up EFS, restoring your phone to stock, resetting the root flag and more...
Q: Im running the Windows .bat as administrator and its closing/not working.
A: There is no need to run the .bat as admin. Just double-click and run.
Q: I get the "Windows cannot find .assetswindows inmintty.exe." error.. watdo?
A: Try just double-clicking on the .bat instead of running as admin.
Also make sure the script is extracted properly first before running.
Q: I [used Flashify and] am stuck in fastboot.. how can I get out?
A: Be cautious using Flashify as it seems its not working right.. or people are hitting the wrong buttons with it.
HERE are the stock TMO D851 partitions.
Use fastboot to flash recovery(TWRP or stock) and stock boot. This will install TWRP and fix booting into rom.
If on Windows you will need fastboot drivers. Use Google to find fastboot binaries and drivers.
Code:
fastboot flash boot boot.img
fastboot flash recovery recovery.img
fastboot reboot
Place TWRP on the root of your internal /sdcard/ using MTP, downloading it directly to phone or using ADB push.
Code:
adb push name_of_file.img /sdcard/Disable OTA:
adb shell
su
dd if=/sdcard/name_of_file.img of=/dev/block/platform/msm_sdcc.1/by-name/recovery
(This worked on LG G2.. hopefully work on G3 but wont be confirmed until OTA comes out)
Look, instead of rushing to take an OTA to get the latest software.. think for a moment.
We do no know if the TMO D851 boot loader will stay unlocked in future updates. OTAs can update not only software..
but the boot stack as well.. enabling features to block downgrades.. close exploits.. and all sorts of fun stuff.
so.. instead of taking an OTA.. wait for the files to get posted so we can look at things first.. possibly only updating /system, /boot, modem (maybe tz/rpm)
without updating the rest of the boot stack. ya... do that.
EFS Backup:
Backup EFS after jailbreaking your G3. EFS is split into 2 partitions modemst1 and modemst2.
img files will be on root of internal sdcard. Save the .img files somewhere else besides the sdcard... email, cloud, etc..

DO NOT FLASH OTHER PEOPLES EFS OR FLASH YOUR OWN BACKUPS ONTO ANOTHER PHONE.
THIS WILL BREAK EFS ON THE PHONE YOU ARE FLASHING TO. EFS BACKUPS ARE FOR THE PHONE THEY CAME FROM ONLY.

HERE is an EFS backup .zip that can be flashed in TWRP.
the zip creates a new flashable zip in /sdcard/efs_backup
you can flash this new flashable zip in TWRP any time you need to restore your EFS.

Or you can do it manually...

Backup:
adb shell
su
dd if=/dev/block/platform/msm_sdcc.1/by-name/modemst1 of=/sdcard/modemst1.img
dd if=/dev/block/platform/msm_sdcc.1/by-name/modemst2 of=/sdcard/modemst2.img

Restore:
adb shell
su
dd if=/sdcard/modemst1.img of=/dev/block/platform/msm_sdcc.1/by-name/modemst1
dd if=/sdcard/modemst2.img of=/dev/block/platform/msm_sdcc.1/by-name/modemst2
Restoring Stock / Remove root flag:
Download the tmo .tot file and use lg flash to restore it to stock. itll format everything on internal sdcard so backup anything u may need off it.
T-Mobile firmware can be found here. Thanks to @wolfgart for the files and @thecubed for codefire hosting.
*Step by step picture guide - http://imgur.com/W83hMPE
install the drivers.
put phone into Download Mode (power off. unplug USB. pull battery. put battery back in. press/hold Volume Up then plug in USB cable.)
In Windows Device Manager set the phones serial COM port to #41. (*see picture guide for help)
Install LG Flash. In "C:LGLG Flash" folder delete megalock dll. Replace with .dll below.
new megalock dll - http://bit.ly/1cQADXm (this site includes a "download manager.. UNCHECK THE BOX before downloading dll file.)
Run LG Flash in the "C:LGLG Flash" folder. Select korean factory if asked.
When LG Flash opens you will see a box to select firmware and dll.
Select LG Flash .dll
Select (.tot)
Hit OK (*see picture guide for help)
Hit yellow start button. If you get Milkyway error click ok. LG Flash will then run a crc check on the tot file. Takes a bit.
After crc check finishes unplug the phone. plug phone back in. it should now be seen in LG Flash and start flashing.
Phone will reboot when finished. You may end up on a screen with s "2"... let it sit there for a minute or two.
If stuck on "2" try unplugging the usb cable from the phone.. wait 10 seconds.. then plug the usb cable back in. now wait 30 seconds and hopefully it changes to a "3"
Once the phone says "3" you can unplug the USB.. remove the battery and plug back in.. boot back up... you are now 100% stock.
T-Mobile firmware can be found here. Thanks to @wolfgart for the files and @thecubed for codefire hosting.
*Step by step picture guide - http://imgur.com/W83hMPE
install the drivers.
put phone into Download Mode (power off. unplug USB. pull battery. put battery back in. press/hold Volume Up then plug in USB cable.)
In Windows Device Manager set the phones serial COM port to #41. (*see picture guide for help)
Install LG Flash. In "C:LGLG Flash" folder delete megalock dll. Replace with .dll below.
new megalock dll - http://bit.ly/1cQADXm (this site includes a "download manager.. UNCHECK THE BOX before downloading dll file.)
Run LG Flash in the "C:LGLG Flash" folder. Select korean factory if asked.
When LG Flash opens you will see a box to select firmware and dll.
Select LG Flash .dll
Select (.tot)
Hit OK (*see picture guide for help)
Hit yellow start button. If you get Milkyway error click ok. LG Flash will then run a crc check on the tot file. Takes a bit.
After crc check finishes unplug the phone. plug phone back in. it should now be seen in LG Flash and start flashing.
Phone will reboot when finished. You may end up on a screen with s "2"... let it sit there for a minute or two.
If stuck on "2" try unplugging the usb cable from the phone.. wait 10 seconds.. then plug the usb cable back in. now wait 30 seconds and hopefully it changes to a "3"
Once the phone says "3" you can unplug the USB.. remove the battery and plug back in.. boot back up... you are now 100% stock.
Original Source Xda-developers
Go to link download
Tuesday, November 1, 2016
Samsung Galaxy W I8150 Firmware Flash File How To Install Using Odin Firmware Guide
Samsung Galaxy W I8150 Firmware Flash File How To Install Using Odin Firmware Guide
For the record, flashing causes a violation of the garantuee policy of Samsung. Furthermore there is a possibility of demaging the Android-system(bricking). It has been reported that flashing has caused in a several(ca. 10) cases a brick. So please be aware THIS IS A RISK. Until now we couldnt find out what caused the bricking, it has been reported with the asian firmware. But also once with the german firmware.
So whoever takes the risk, takes the responsibility
How to Flash a firmware with ODIN
Note: Please scroll down and read the Notification if you have not already done so !!!
1.a) Download Firmware :
So whoever takes the risk, takes the responsibility
How to Flash a firmware with ODIN
Note: Please scroll down and read the Notification if you have not already done so !!!
1.a) Download Firmware :
All the firmwares contain the Odin Multi Downloader v4.43.exe and the Ancora.OPS-file.
- I8150XXLA2 Android 2.3.6 (GER) (SALES CODES: DBT(Germany))
- I8150XXKK1 Android 2.3.6 (EUR) (SALES CODES: XSK, XEZ, XEU, XEO, XEH,XEF, TPH, TOP, SMO, SEB, PAN, MSR, GBL, CYO, CPW, COA, BGL)
- I8150XXKI8 Android 2.3.5 (ITL-EUR) (SALES CODES: ???)
- I8150ZSKI3 Android 2.3.6 (ASIA) (SALES CODES: ???)
- OPS – Ancora.ops.
Boot – APBOOT_I8150ZSKI3_CL613004_REV00_user_low_ship_EMM C.tar.md5
Phone – SMD_MODEM_I8150ZSKI3_CL613004_REV00_user_low_ship_ EMMC.smd.md5
PDA – SMD_PDA_I8150ZSKI3_CL613004_REV00_user_low_ship_EM MC.smd.md5
CSC – SMD_CSC_GT-I8150-MULTI-CSC-OZSKI3_EMMC.smd.md5
1.b) If you already have a firmware, you can download the Ancora.OPS and the Odin Multi Downloader v4.43.exe
2. While switched off, keep the following buttons pressed. Release the power-button once the Samsung Galaxy W(I8150) is switched on.

As soon as the screen with the exclamation mark appears hit the Volume up-button. Now you should be in the download mode.
Connect your device to the Computer.
Note: In order that your Samsung Galaxy W to be detected by ODIN, you will have to install the drivers manually or install Kies (Kies can be uninstalled right after, if prefered, because the drivers will remain in the system). Make sure Kies is not running in the task-manager, while using ODIN.

INFO: The download-mode is being used to flash firmwares, without using the official method of Samsung Kies. This should be reachable even if you have a corrupted firmware installed.
3. Open Odin Multi Downloader v4.43.exe . INFO: Use ODIN Multi Download v.4.43, I reported some issues with lower versions
4. click on the OPS-Button and select the Ancora.ops file.
5. Set up the settings as followed:
mark the option: One Package, Protect OPS, Auto Rebootunmark the option: Reset Time (Sec)
6.Click on the One Package-Button and select the downloaded MD5-file.
7. Click on the Start-Button. Flashing takes around 10-15 minutes. and the first start up takes up to 5 min., so please dont panic and dont press anything until the home screen appears!
Notification
Maybe it is more secure to make a full wipe using ClockWorkMod.
The reason why these complicated steps might be necessary: Because your system most likely be a mess, if you were flashing all different kinds of firmwares. To make sure your device is not an overwritten old firmware these steps are necessary.
Flashing firmwares via ODIN does not delete all old data !!!
Use this course of action:
1. Backup everything manually what you can!
2. If you have not already installed ClockWorkMod, use the flash instruction from above and download the ClockWorkMod from the section Other.
3. Once ClockWorkMod is flashed, go to the Recovery Mode(which is the ClockWordMod):
a) backup and restore -> backup to external sdcard
b) backup and restore -> restore from external sdcardThis is to make sure the files arent corrupted, if this is successful you can be sure everything is backupped. If you get a MD5 mismatch something went wrong. Try again!
c) wipe data/factory reset -> confirm
d) wipe cache partition -> confirm
e) mounts and storage -> format system -> confirm
f) mounts and storage -> format cache -> confirm
g) mounts and storage -> format data -> confirm
4. You restart your phone in Download Mode and flash a firmware using this, which is provided in the thread under Firmwares.
5. Now you will have to flash again the ClockWorkMod recovery to restore your data.
Note: But this is only possible if the previous firmware is compatible with the current one. Most custom ROMs arent compatible with the stock ROMs or other custom ROMs!
Than open ClockWorkMod Recovery and:
backup and restore-> advanced restore from external sdcard -> select the backup -> Restore data -> confirm.
Now if you want the stock recovery back(needed for OTA updates) instood of ClockWorkMod, than go to Other and select the stock recovery, and flash it on your device.
6. Now you should have a fresh device like you have never flashed before!!!
2. While switched off, keep the following buttons pressed. Release the power-button once the Samsung Galaxy W(I8150) is switched on.
As soon as the screen with the exclamation mark appears hit the Volume up-button. Now you should be in the download mode.
Connect your device to the Computer.
Note: In order that your Samsung Galaxy W to be detected by ODIN, you will have to install the drivers manually or install Kies (Kies can be uninstalled right after, if prefered, because the drivers will remain in the system). Make sure Kies is not running in the task-manager, while using ODIN.
INFO: The download-mode is being used to flash firmwares, without using the official method of Samsung Kies. This should be reachable even if you have a corrupted firmware installed.
3. Open Odin Multi Downloader v4.43.exe . INFO: Use ODIN Multi Download v.4.43, I reported some issues with lower versions
4. click on the OPS-Button and select the Ancora.ops file.
5. Set up the settings as followed:
mark the option: One Package, Protect OPS, Auto Rebootunmark the option: Reset Time (Sec)
6.Click on the One Package-Button and select the downloaded MD5-file.
7. Click on the Start-Button. Flashing takes around 10-15 minutes. and the first start up takes up to 5 min., so please dont panic and dont press anything until the home screen appears!
Notification
Maybe it is more secure to make a full wipe using ClockWorkMod.
The reason why these complicated steps might be necessary: Because your system most likely be a mess, if you were flashing all different kinds of firmwares. To make sure your device is not an overwritten old firmware these steps are necessary.
Flashing firmwares via ODIN does not delete all old data !!!
Use this course of action:
1. Backup everything manually what you can!
2. If you have not already installed ClockWorkMod, use the flash instruction from above and download the ClockWorkMod from the section Other.
3. Once ClockWorkMod is flashed, go to the Recovery Mode(which is the ClockWordMod):
a) backup and restore -> backup to external sdcard
b) backup and restore -> restore from external sdcardThis is to make sure the files arent corrupted, if this is successful you can be sure everything is backupped. If you get a MD5 mismatch something went wrong. Try again!
c) wipe data/factory reset -> confirm
d) wipe cache partition -> confirm
e) mounts and storage -> format system -> confirm
f) mounts and storage -> format cache -> confirm
g) mounts and storage -> format data -> confirm
4. You restart your phone in Download Mode and flash a firmware using this, which is provided in the thread under Firmwares.
5. Now you will have to flash again the ClockWorkMod recovery to restore your data.
Note: But this is only possible if the previous firmware is compatible with the current one. Most custom ROMs arent compatible with the stock ROMs or other custom ROMs!
Than open ClockWorkMod Recovery and:
backup and restore-> advanced restore from external sdcard -> select the backup -> Restore data -> confirm.
Now if you want the stock recovery back(needed for OTA updates) instood of ClockWorkMod, than go to Other and select the stock recovery, and flash it on your device.
6. Now you should have a fresh device like you have never flashed before!!!
Go to link download
Samsung Galaxy S3 L710 Sprint Firmware Version 4 4 2 cdma meid repair and change Without Root Guide 100 Worked
Samsung Galaxy S3 L710 Sprint Firmware Version 4 4 2 cdma meid repair and change Without Root Guide 100 Worked
Samsung 4.4.2 L710 meid repair change 100% Worked

As we all know samsung new security all new os you can not write meid older way..
NO ROOT.
NO PATCH.
JUST C3303K CABLE + ANY FTDI BOX.
gcprokey is only tool in market can repair most samsung cdma meid 4.3,4.4.x most versions.
here is sample of L710 MEID change.
Using Version...1.0.0.0005
Selected Port VCP0 = COM3
Selected Model Samsung GSM
Selected Task SAM MEID
SAMSUNG MEID REPAIR STARTED...
Searching Phone Please wait...
Phone Found Wait...
TEST MODE OK..
Model := SPH-L710
UNIQID := CMAF74A19C462AF
Phone MEID := 990003342XXXXX
MSL found can continue..
Autho Pass..
SEED Passed..
Update MEID Ok..
Repairing finish.
All Finish..
!!! Success !!!!
Total Time Take...00:00:30
Selected Port VCP0 = COM3
Selected Model Samsung GSM
Selected Task SAM MEID
SAMSUNG MEID REPAIR STARTED...
Searching Phone Please wait...
Phone Found Wait...
TEST MODE OK..
Model := SPH-L710
UNIQID := CMAF74A19C462AF
Phone MEID := 990003342XXXXX
MSL found can continue..
Autho Pass..
SEED Passed..
Update MEID Ok..
Repairing finish.
All Finish..
!!! Success !!!!
Total Time Take...00:00:30
Just to show meid is really changed i did repair again..
Using Version...1.0.0.0005
Selected Port VCP0 = COM3
Selected Model Samsung CDMA
Selected Task SAM MEID
SAMSUNG MEID REPAIR STARTED...
Searching Phone Please wait...
Phone Found Wait...
TEST MODE OK..
Model := SPH-L710
UNIQID := CMAF74A19C462AF
Phone MEID := A10001XXXXXXX
MSL found can continue..
Autho Pass..
SEED Passed..
Update MEID Ok..
Repairing finish.
All Finish..
!!! Success !!!!
Total Time Take...00:00:32
Selected Port VCP0 = COM3
Selected Model Samsung CDMA
Selected Task SAM MEID
SAMSUNG MEID REPAIR STARTED...
Searching Phone Please wait...
Phone Found Wait...
TEST MODE OK..
Model := SPH-L710
UNIQID := CMAF74A19C462AF
Phone MEID := A10001XXXXXXX
MSL found can continue..
Autho Pass..
SEED Passed..
Update MEID Ok..
Repairing finish.
All Finish..
!!! Success !!!!
Total Time Take...00:00:32
Go to link download
Sunday, October 23, 2016
Guide How to Hard Reset NXG Xtab A10 Solution
Guide How to Hard Reset NXG Xtab A10 Solution
NXG Xtab A10 Hard Reset DONE
NXG Xtab A10 with OG flash file&tool

Uploaded with ImageShack.us
Firmware link#
NXG_Xtab_A10_StockROM_ICS_4.0.3_
NXG_Xtab_A10_StockROM_ICS_4.0.3_1st_April_2012
Flash tool link#
A10_Lve Suit
A10_LiveSuitPack_version_1.09_20111101
Drivers link#
ABD Drivers
ADBDrivers
Go to link download
Friday, October 21, 2016
CWM Based Recovery 6 0 4 6 Touch Recovery for Xperia Z2 How To Guide
CWM Based Recovery 6 0 4 6 Touch Recovery for Xperia Z2 How To Guide
CWM-Based Recovery 6.0.4.6 Touch Recovery for Xperia Z2 How To Guide
info:This Recovery is built from CWM 6.0.4.6 sources!
I dont have this device with me and but would love to have one!...
all the testing was done remotely on users devices... thanks to @yeeson for testing on his Z2 !!![ PROOF ]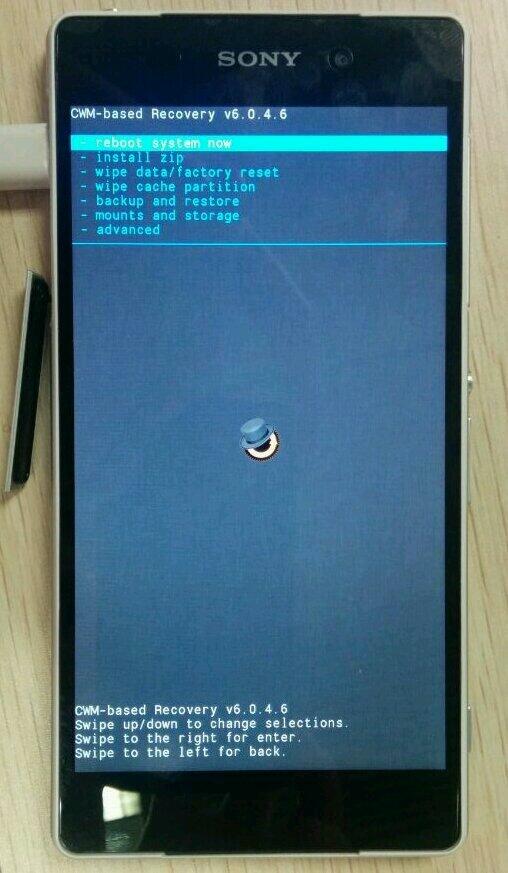
[ credits / special thanks ]
I dont have this device with me and but would love to have one!...
all the testing was done remotely on users devices... thanks to @yeeson for testing on his Z2 !!![ PROOF ]
[ credits / special thanks ]
- Koush - for the brilliant work & coding on CWM recovery
- CyanogenMod and FreeXperia Team (especially jerpelea) for too many things *
- special thanks to @yeeson for helping out with testing and risking his devices for the sake of development!!! and NO, his phone was NOT damaged during testing
- ME for creating this for u guys!

[ Requirements ]
- Bootloader unlocked
- working fastboot
- STOCK ROM FW:
- 4.4.2
- 17.1.A.2.36 - v01
- 4.4.2
[ features ]
- standard CWM recovery 6.0.4.6 - TOUCH RECOVERY!
- kernel is insecure (ro.secure=0)
- adb debugging is enabled by default in OS
- TIP: if u are experiencing very slow backup in CWM do this
[ WARNING ]
for flashing this kernel you WILL NEED TO UNLOCK BOOTLOADER! Check this thread for more info (same steps as Xperia Z1 are used for Xperia Z2)
UNLOCKING BOOTLOADER WITHOUT TA BACKUP WILL LEAD TO IRREVERSIBLE LOSS OF DRM KEYS!!!
AND YES CAMERA STILL WORKS AFTER UNLOCKING BOOTLOADER!!!
[ known issues ]
for flashing this kernel you WILL NEED TO UNLOCK BOOTLOADER! Check this thread for more info (same steps as Xperia Z1 are used for Xperia Z2)
UNLOCKING BOOTLOADER WITHOUT TA BACKUP WILL LEAD TO IRREVERSIBLE LOSS OF DRM KEYS!!!
AND YES CAMERA STILL WORKS AFTER UNLOCKING BOOTLOADER!!!
[ known issues ]
- adb is not working in recovery (can be fixed later)
[ how to flash this kernel ] (via fastboot)
- download the kernel image
- save the boot.img to the folder containing fastboot binary
- flash the boot.img using fastboot:Code:reboot from fastboot Code:
fastboot flash boot boot.img
fastboot reboot
- the device should now start booting
- enjoy!
when you see the Sony logo and the LED light turns pink/amber/orange keep tapping/pressing VOLUME UP key
[ how to Root ]
for instructions on how to root please check this post
[ sources ]
https://github.com/DooMLoRD/android_device_sony_honami
for now recovery is same is same as honami
[ donations ]
Please do consider donating as I plan to get this device!
if u feel that this work has helped u OR u think that the work i put into making this is worthy of donations, then click on the following link for buying me some coffee/beer/etc

PAYPAL DONATION LINK
OR
you can buy one of my awesome apps from Play Store!
[ download links ]
PLEASE DO NOT MIRROR, REDISTRIBUTE, REPACK MY FILES
NEW:
Advance Stock Kernel with Recovery v01 (FW:17.1.A.2.36}
MD5HASH: 6e0c418d299780bd0ac74e69ff46a199
Go to link download
Wednesday, October 19, 2016
Samsung S5610k s3770k s5270k 100 succes flashing Guide Flasher
Samsung S5610k s3770k s5270k 100 succes flashing Guide Flasher
flash the phone with s5610k firmware with downloader with all partitions marked(this is very important to mark all partition on both sections)
then rebuild imei with z3x,and if u want to make this to 5610k again ,just flash simply wih 5610k flash files
flashloader-- S5610k With Flash Loader 7.5.3 V0.6 Lite - Download
drver -- sunstone_v5_00_0_1_whqled - Download
bin file --- S5610KDDLH2_BIN Download
csc file
----
1st install sunstone driver
2nd-opan flashloder
and select bin file and csc file like important tips
this is very important to mark all partition on both sections like this image


and boot key 3+6 key with bettery(switch off) and insert c101 usb
then rebuild imei with z3x,and if u want to make this to 5610k again ,just flash simply wih 5610k flash files
flashloader-- S5610k With Flash Loader 7.5.3 V0.6 Lite - Download
drver -- sunstone_v5_00_0_1_whqled - Download
bin file --- S5610KDDLH2_BIN Download
csc file
----
1st install sunstone driver
2nd-opan flashloder
and select bin file and csc file like important tips
this is very important to mark all partition on both sections like this image
and boot key 3+6 key with bettery(switch off) and insert c101 usb
Go to link download
Sunday, October 16, 2016
How To Hard Reset Micromax Canvas Unite 2 A 106 Guide
How To Hard Reset Micromax Canvas Unite 2 A 106 Guide
World First Micromax Canvas Unite 2 (A106) Hard Reset Done

1. Put ur Phone to Switch Off Mode.
2. Then Remove ur Memory Card.
3. Hold (Volume +)(Volume -) Both & Press Power Button Only 3 Second.
4. Then u See In Mobile Screen. Two Option
(1) Recovery Mode
(2) Unknown
5. Select The First Option by Pressing Power Button.
6. Then Appear a Android Logo But here not Appear Recovery Menu.
7. Press Power Button One Time. U See Recovery Menu.
8. Select Wipe Data Option by Pressing Option Key (Phone Left Side Option Key)
9. Select Yes By Volume - Key & Press Option Key
10. Then Reboot ur Phone now.
Go to link download
Saturday, October 8, 2016
Get Install Sony Xperia UI Based ROM for Micromax Unite 2 A106 4 2 2 How to Guide
Get Install Sony Xperia UI Based ROM for Micromax Unite 2 A106 4 2 2 How to Guide
This is custom ROM for Micromax Unite 2 and Myphone Rio Lite
ROM Features :-
- Pre-Rooted
- Init.d support
- Sony Xperia UI
- modded camera
- Improved Battery Life
- No Bloatwares
- Xperia keyboard
- Xperia Launcher
- Xperia lock screen
- Xperia Status bar & icons
- Xposed framework
- Pre installed Gravity box
- Xperia Settings UI
- Sony Walkman App ported
- Sony Album
- Sony movies
- Sony Xperia Boot Screen & Boot audio
Bugs :- NO bugs till now, but if you found then report us.
-:ScreenShots:-


How to Install (Xperia UI Based Sphere ROM for Micromax Unite 2 A106 [4.2.2]) :- (you must be on 4.2.2 Rom before flashing)
- Download & place {mmx A106}{4.2.2}Sphere - (Sony Xperia Styled)by Yogesh.zip into root of sd card.
- Now go to recovery by pressing volume Up+Volume Down+power on/lock screen button simultaneously.
- Do a complete data wipe,cache abd delvik cache clean.
- After that go to install zip from SD Card & Select ROM file.
- Wait for it to flash. it will reboot automatically. first boot will take time wait for it.
- Enjoy Our ROM.
Download Link:-Click here
Note:- This is Ported ROM For micromax unite 2 A106 from micromax canvas 2.2 A114
BASE ROM thread link Click here
Credits :-
- Archer james jose from myphone cyclone group(group link) – For Developing base ROM
- Yogesh Gosavi – For porting it to our Unite 2
- Mayank girdhar – For Helping and fixing errors
- Team Thunder Boys For Support.
Please share your feedback and queries about this ROM in Comments
Go to link download
Friday, October 7, 2016
Android Phones IMEI null invalid repair How To Guide 100 Worked Online Tutorial
Android Phones IMEI null invalid repair How To Guide 100 Worked Online Tutorial
Those days i see many users asking to help For Chines android phones imei repair i dont know why still users face this problems
here we have good imei tool (Maui META) for imei repair and easy to use Here i will see some threads
Anyway here i will guide u to all how to repair imei in chines android phones With Maui META tool
Produce :-
here we have good imei tool (Maui META) for imei repair and easy to use Here i will see some threads
Anyway here i will guide u to all how to repair imei in chines android phones With Maui META tool
Produce :-
- Power on phone
- connect phone to PC
- asking drivers give him
- than turn off phone
- Open maui META tool
- In Options trick 2 one ( Connect smart phone into a META mode)
- press Reconnect
- than inset cable
- asking CDC drivers give him
- after 1 min popup imei tool tab
- than press ( Change NVRAM database file) and give it
- than give both imei ( What u need like 35 or 911 etc )
- than press Download to flash
Note :- 2 things mainly problem face all users
1. stock on cdc drivers ( i will attch this drivers )
2. Stock on (NVRAM database file) mostly user cant select file thats why field to write
Here is the link all BPLGU modem files All Mtk BPLGU Modem files for Imei change.rar
Here is the Latest Maui META tool
MauiMETA_3G_exe_v6.1316.1 MauiMETA_3G_exe_v6.1316.1.rar
MauiMETA_3G_exe_v6.1248.0 http://www.mediafire.com/download/vn..._v6.1248.0.zip
MauiMETA_exe_3G_v6.1244.1 http://www.4shared.com/rar/RGKY4HcS/...g_v612441.html
MauiMETA_exe_3G_v6.1140.0 http://www.4shared.com/rar/kNKTXg0c/...tm?aff=7637829
Here is the detailed videos
Invalid IMEI repair
Android_Gadget_CDC_driver.rar
2. Stock on (NVRAM database file) mostly user cant select file thats why field to write
Here is the link all BPLGU modem files All Mtk BPLGU Modem files for Imei change.rar
Here is the Latest Maui META tool
MauiMETA_3G_exe_v6.1316.1 MauiMETA_3G_exe_v6.1316.1.rar
MauiMETA_3G_exe_v6.1248.0 http://www.mediafire.com/download/vn..._v6.1248.0.zip
MauiMETA_exe_3G_v6.1244.1 http://www.4shared.com/rar/RGKY4HcS/...g_v612441.html
MauiMETA_exe_3G_v6.1140.0 http://www.4shared.com/rar/kNKTXg0c/...tm?aff=7637829
Here is the detailed videos
Invalid IMEI repair
Change IMEI
For this tool change imei U no need to root Ur phoneAndroid_Gadget_CDC_driver.rar
Go to link download
Tablet Q88 v1 6 20120804 2 Camera Flash Done With Original Rom How To Guide
Tablet Q88 v1 6 20120804 2 Camera Flash Done With Original Rom How To Guide
Tablet (Q88 v1.6 20120804) 2 Camera Flash / Update Done
Android Version 4.0.4
no confusion To download Because
PCB Text / Info /ID - Q88 v1.6 20120804
Download - Q88 v1.6 20120804 Android Ver4.0.4
ROM PASSWORD - 0817655994

Update To 4.0.4 /Flash Done & 2 Camera Working & all work

Tested By tested reporter
Android Version 4.0.4
no confusion To download Because
PCB Text / Info /ID - Q88 v1.6 20120804
Download - Q88 v1.6 20120804 Android Ver4.0.4
ROM PASSWORD - 0817655994
Update To 4.0.4 /Flash Done & 2 Camera Working & all work
Tested By tested reporter
How To Use PhoenixSuite Guide
Go to link download
Saturday, September 24, 2016
Intex Cloud X12 Pattern unlock done 100 tested Flash File Working without flash no need box Guide
Intex Cloud X12 Pattern unlock done 100 tested Flash File Working without flash no need box Guide
Intex Cloud X12 Pattern unlock done 100% tested without flash, no need box
:: Model ::
:: Model ::

:: Procedure ::
* Must your mobile battery 70% charged
* Open Tool and select file
* Press & Hold vol. up key and insert USB cable
* You are done
:: Tutorial ::

* Must your mobile battery 70% charged
* Open Tool and select file
* Press & Hold vol. up key and insert USB cable
* You are done
:: Tutorial ::

:: File or Tool ::
Download File
Download Tool
Go to link download
Friday, September 23, 2016
UFSx HWK Install Files Mirrors Install Instructions Guide
UFSx HWK Install Files Mirrors Install Instructions Guide
UFSx_Support_Suite_Setup_v02.03.00.06.exe - UFSx_Support_Suite_Setup_v02.03.00.06.exe
DHLT Files - Samsung Fast Code Calc Tables
DHT.part01.exe - DHLT.part01.exe - DHLT.part01.exe
DHT.part02.rar - DHLT.part02.rar - DHLT.part02.rar
DHT.part03.rar - DHLT.part03.rar - DHLT.part03.rar
DHT.part04.rar - DHLT.part04.rar - DHLT.part04.rar
DHT.part05.rar - DHLT.part05.rar - DHLT.part05.rar
DHT.part06.rar - DHLT.part06.rar - DHLT.part06.rar
DHT.part07.rar - DHLT.part07.rar - DHLT.part07.rar
1. Uninstall ALL previous versions, you MUST uninstall HWK Suite BEFORE trying to uninstall HWK Support Suite Setup. 2. Install UFSx Support Suite Setup 3. Connect your UFSx+HWK before running the UFSx Control Panel 4. Run UFSx Control Panel 5. Switch to the "Hardware" Tab 6. If you only have one UFSx connected it will be selected, if more than one, select the check box next to the required UFSx. You can click "Scan Boxes" to refresh the list if you have connected further boxes since opening the Control Panel 7. Click "Check Box" 8. Click "Update Box" 9. Click "Check Box" - Make sure "Box Status" = "True" or "Bad Software" and "Server Status" = "Support Ok", before proceeding 10. Switch to the "Software" Tab 11. Amend "Application Install Path" and/or "Nokia Install Path", if required. 12. Click "Check Server" 13. Click "Install" 14. If you have more than 1 UFSx+HWK run steps 5-13 for each UFSx+HWK (NOTE: You must install something at step 13)
How to install same UFSx+HWK to 2nd PC.
Same as above and you must complete ALL steps.
How to add further UFSx+HWK after initial install.
Steps 4-13 as above
DHLT Files
Should be extracted and installed too:-
C:Program FilesSarasSoftUFSUFS_SAMs_DHT for 32bit PCs
C:Program Files (x86)SarasSoftUFSUFS_SAMs_DHT for 64bit PCs
DHLT Files - Samsung Fast Code Calc Tables
DHT.part01.exe - DHLT.part01.exe - DHLT.part01.exe
DHT.part02.rar - DHLT.part02.rar - DHLT.part02.rar
DHT.part03.rar - DHLT.part03.rar - DHLT.part03.rar
DHT.part04.rar - DHLT.part04.rar - DHLT.part04.rar
DHT.part05.rar - DHLT.part05.rar - DHLT.part05.rar
DHT.part06.rar - DHLT.part06.rar - DHLT.part06.rar
DHT.part07.rar - DHLT.part07.rar - DHLT.part07.rar
1. Uninstall ALL previous versions, you MUST uninstall HWK Suite BEFORE trying to uninstall HWK Support Suite Setup. 2. Install UFSx Support Suite Setup 3. Connect your UFSx+HWK before running the UFSx Control Panel 4. Run UFSx Control Panel 5. Switch to the "Hardware" Tab 6. If you only have one UFSx connected it will be selected, if more than one, select the check box next to the required UFSx. You can click "Scan Boxes" to refresh the list if you have connected further boxes since opening the Control Panel 7. Click "Check Box" 8. Click "Update Box" 9. Click "Check Box" - Make sure "Box Status" = "True" or "Bad Software" and "Server Status" = "Support Ok", before proceeding 10. Switch to the "Software" Tab 11. Amend "Application Install Path" and/or "Nokia Install Path", if required. 12. Click "Check Server" 13. Click "Install" 14. If you have more than 1 UFSx+HWK run steps 5-13 for each UFSx+HWK (NOTE: You must install something at step 13)
How to install same UFSx+HWK to 2nd PC.
Same as above and you must complete ALL steps.
How to add further UFSx+HWK after initial install.
Steps 4-13 as above
DHLT Files
Should be extracted and installed too:-
C:Program FilesSarasSoftUFSUFS_SAMs_DHT for 32bit PCs
C:Program Files (x86)SarasSoftUFSUFS_SAMs_DHT for 64bit PCs
Go to link download
Wednesday, September 21, 2016
Samsung I9300 direct emmc boot repair issue Solved How To Guide 100 Tested
Samsung I9300 direct emmc boot repair issue Solved How To Guide 100 Tested
Today i have come one Samsung i9300 which is automatically dead
i will try to repair boot with Mmc method not work than i will try TP mmc method its also not work
After that try with direct emmc method connection OK
But just hang on any Oparaction not erased not write etc ...
Here is the error log
Download this:
i9300_atf_emmc.rar

i will try to repair boot with Mmc method not work than i will try TP mmc method its also not work
After that try with direct emmc method connection OK
But just hang on any Oparaction not erased not write etc ...
Here is the error log
Download this:
i9300_atf_emmc.rar
Code:
======================================================
======================================================
 eMMC Test Point Connection Module
======================================================
==========================================Code:============

1. DO NOT USE THE PHONE"S BATTERY
2. Connect the Soldered TP Connections to ATF Box
3. Disconnect the USB Cable and Wait until the
 the ATF Software will tell you to Connect the USB.


Interface Reset OK!
eMMC Access Type: SECTOR MODE
eMMC Supported Voltage Range:
3.5-3.6V, 3.4-3.5V, 3.3-3.4V, 3.2-3.3V, 3.1-3.2V
3.0-3.1V, 2.9-3.0V, 2.8-2.9V, 2.7-2.8V, 1.9-2.0V
1.45-1.50V

CID : 15010056545530304DF159A77732
CSD : D02701320F5903FFF6DBFFFF8E40406D

eMMC Boot Information
Revision 1.6 (for MMC v4.5)
BOOT PARTITION : BOOT PARTITION 1
PARTITION ACCESS : R/W USER PARTITION
PERM_BOOT_CFG_PROT : DISABLED
PWR_BOOT_CFG_PROT : DISABLED
BOOT MODE : x4 SINGLE DATA RATE + LOW SPEED
RESET BUS WIDTH : ENABLED
eMMC FirmW UPDATE : DISABLED
EMMC CACHE SIZE : 0 KB
SUPER PAGE SIZE : 3584 KB
HC ERASE GROUP SIZE: 512 KB
USER AREA SIZE : 15758000128 BYTES
BOOT PARTITION SIZE: 2048 KB
RPMB PARTITION SIZE: 128 KB


eMMC Device Information
Manufacturer ID: SAMSUNG
Device Type : Embedded BGA
Application ID : 00
Product Name : VTU00M
Product Rev : 15.1
Product SN : 59A77732
Manufactured : January 2012

Card Specific Data
CSD_STRUCTURE : Extended
SPEC_VERS : Version 4.1/4.2/4.3
TAAC : 13 ns
TRANS_SPEED : 4000000 KHz
READ_BL_LEN : 512 Bytes
C_SIZE : HIGH CAPACITY
WP_GRP_ENABLE : YES
WRITE_BL_LEN : 512 Bytes
CONTENT_PROT_APP : NO
PERM_WRITE_PROTECT: NO
TMP_WRITE_PROTECT : NO

Extended CSD Saved:
15010056545530304DF159A77732_932DD6C7.ext_csd
Backup Directory:
G:All Software BoxA T FAdvanceBox Turbo FlashereMMCEXT_CSD


Task Selected: Normal Factory Erase
======================================================
For eMMC Revision 1.2 (for MMC v4.2) and LOWER
--> This will ERASE USER AREA, BOOT1, BOOT2, and RPMB
For eMMC Revision 1.3 (for MMC v4.3) and HIGHER
--> This will ONLY ERASE USER AREA
======================================================
This eMMC is: Revision 1.6 (for MMC v4.5)

Factory Erasing Supported FLASH AREA...
here is my connection pic


Atf team supporters Pls kindly tell me Where Im doing wrong
Atf team supporters Pls kindly tell me Where Im doing wrong
Go to link download
Tuesday, September 20, 2016
Samsung SM N750 Galaxy Note 3 Neo Imei Repair With BST Guide How To
Samsung SM N750 Galaxy Note 3 Neo Imei Repair With BST Guide How To
Worlds First Samsung Note 3 Neo Imei Repair By BST Tool
SM-N750 100% Tested
SM-N750 100% Tested
Go to link download
Sunday, September 18, 2016
Guide Livesuit Flashing Tool Tutorial How to Firmware Update
Guide Livesuit Flashing Tool Tutorial How to Firmware Update
How to Flashing Tablet with LiveSuit Pack ...
Firmware update
Step by Step Tutorial .
click here to download LiveSuit Pack.


Go to link download
Subscribe to:
Posts (Atom)