Wednesday, November 16, 2016
How to Install Android 4 4 KitKat Based ROM on Galaxy S3 GT I9300 GT I9305 AT T Sprint T Mobile Verizon
How to Install Android 4 4 KitKat Based ROM on Galaxy S3 GT I9300 GT I9305 AT T Sprint T Mobile Verizon

Owning a Google Nexus device is a kind of guarantee that you would be one of the first to receive the latest version of Android, but if you got a phone/tablet from manufacturers like Samsung, LG, HTC, Sony, etc., you might have no choice but to wait perpetually. Even if you get a new (?) update, it’s got to be an old thing by the time it reaches you. Samsung’s treatment with its popular phones like the Galaxy S3 and Note 2 is a very relevant example of how manufacturers shirk from sending software updates to their users.
Yesterday we published an article on installing Android 4.4 KitKat based custom ROMs on the Galaxy Note 2 and many of its variants. Extending our KitKat treat, we have now come with a collection of Android 4.4 custom ROMs for the Samsung Galaxy S3. If you own any of the following variants of the device, you can update your phone with the newest sensation of Android:
- Samsung Galaxy S3 GT-I9300
- Samsung Galaxy S3 LTE GT-I9305
- AT&T Galaxy S3 SGH-I337 (the ROMs for this model can also be installed on the Canadian variants e.g, Rogers, Bell, Telus, etc.)
- Sprint Galaxy S3 SPH-L710
- T-Mobile Galaxy S3 SGH-T999
- Verizon Galaxy S3 SCH-I535
Warning:
The procedure described below is not meant for perfect noobs as it is considered risky. Follow all instructions carefully if you do not wish to caught into a compromising situation. We would always be at our end to help you in case of a mishap but we take no responsibility. Proceed only if you agree to these terms.Prerequisites:
- A rooted Samsung Galaxy S3. If you have not rooted your phone yet, please take some time and root it using our easy rooting tutorial.
- The KitKat ROMs we are going to talk about are custom ROMs and therefore they require the presence of a custom recovery like ClockworkMod or TWRP on your device. Not only this, you must have the latest version of the recovery you use. You can download ROM Manager (CWM) or Goo Manager (TWRP) to install the latest version.


Note:
Since Goo Manager is working properly these days, we recommend that you install CWM version 6.0.4.3 on your device. If you know how to install recovery image file using ADB command, download the latest CWM recovery .img file from here and install it. 6.0.4.3About the ROMs:
Please note that most of the ROMs that we have mentioned below are based on CM 11 and therefore have all the bugs of their parent. Being in early stage of development, it is obvious that you might encounter a few bugs in performance. Please install the appropriate ROM on your phone, test them and if you find them stable enough for you,use them. We hope that with new updates, all these ROMs will become more mature and stable.
Downloads:
Download the Android 4.4 ROM:
Now here are the CyanogenMod 11 based KitKat ROMs for Samsung Galaxy S3. In case you find more that one ROM listed for your S3 model, download any of the two.- Samsung Galaxy S3:
- CM 11 Unofficial ROM: cm-11-2013-UNOFFICIAL-i9300-V5.zip
- Samsung Galaxy S3 LTE:
- CM 11 Unofficial ROM: cm-11-2013-UNOFFICIAL-i9305.zip
- AT&T & Canadian Galaxy S3 (SGH-1747 and 1747M):
- CM 11 Unofficial ROM: cm-11-2013-UNOFFICIAL-d2att.zip
- Quantum ROM: Quantum-v3-Beta.zip
- BeansTalk ROM: BeanStalk-4.4001-20131120-d2att.zip
- Sprint Galaxy S3:
- CM 11 Unofficial ROM: cm-11-2013-UNOFFICIAL-d2spr.zip
- T-Mobile and Canadian Galaxy S3 (SGH-T999 and T999V):
- CM 11 Unofficial ROM: cm-11-2013-UNOFFICIAL-d2tmo.zip
- Verizon Galaxy S3:
- CM 11 Unofficial ROM: cm-11-2013-UNOFFICIAL-d2vzw.zip
Download Google Apps:
Google apps are not included in the ROM package. Therefore, you need to download and install them separately. Always choose the latest version of Gapps.pa_gapps-full-4.4-20131118-signed.zip
Mediafire Mirror
Download Latest SuperUser:
UPDATE-SuperSU-v1.69.zipHow to Install:
- Important: Do not forget to backup your phone’s EFS/IMEI before. Read this article for detailed tutorial.
- Charge your phone.
- Copy the downloaded Android 4.4 ROM file and the latest Gapps package from above and copy them to your phone.
- Also copy the SuperSU zip file to the device.
- Boot your Galaxy in recovery mode. Here is how to do it: hold down the Volume Up+Home+Power buttons together for 4-6 seconds till the screen turns up and you see the recovery screen. Alternatively,you can enter recovery mode using these apps.
- If you are using CWM, use the volume keys to scroll up/down and the power button to select files and options. TWRP users can simply touch the corresponding buttons to get a job done.
- Important: Before doing anything, do not forget to backup your current ROM using “backup and restore”option (in CWM) or “Backup” option (in TWRP) and check all items to backup.
- CWM Users: Go back to main menu in recovery and select “wipe data / factory reset> yes”. Then go to“mounts and storage” and wipe data and system.
- TWRP Users: Just tap on “Wipe” button and select Data, System and Cache.
- Now go back again and choose “install zip from sdcard> choose zip from sd card” option, select the ROM file in zip and choose “yes” when asked. If you have TWRP, use “Install” button, select the ROM and swipe the slider to confirm installation.
- When the ROM is installed, install the Gapps zip package just like you flashed the ROM in Step 11.
- Then install the ”UPDATE-SuperSU-v1.69.zip” file the same way.
- Finally, select the reboot system option.
Go to link download
Tuesday, November 15, 2016
How To Unlock Pattern On Xiaomi mi 3
How To Unlock Pattern On Xiaomi mi 3
If you have forgotten you phone password or Pattern or you are unable to turn ON your phone than follow this few steps.
Step 1: Turn off your phone.
Step 2: Make sure that battery fully charge.
Step 3: Press and Hold together Volume up button + Power Button for several seconds to go to recovery mode.
Step 4: Now, Select ENGLISH using Volume down key and power key to confirm.
Step 5: Now, Select WIPE AND RESET.

Step 6: Now, Select WIPE ALL DATA. (warning: your all phone data will be deleted)
Step 7: Now, wait few seconds to complete the process.
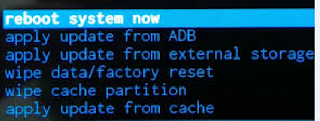
Step 8: Select Reboot System Now.
Go to link download
How to flash Nokia Asha 206 with hwk box repair tool By USB Cable
How to flash Nokia Asha 206 with hwk box repair tool By USB Cable

Go to link download
How to flash Xiaomi Mi 4i Stock ROM
How to flash Xiaomi Mi 4i Stock ROM
Step 1: Download Xiaomi Stock ROM on your phone from below link.
Step 2: Open Tools Folder from the Launcher and Select Updater like below image.
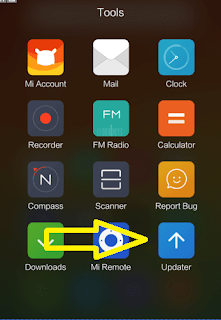
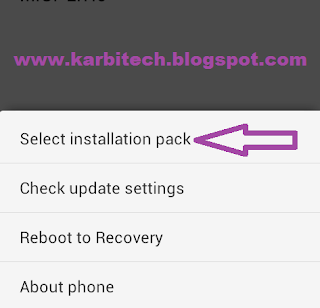
Step 3: Now, click on Menu Key on your Device and Select installation file.
Step 4: Locate the zip file that you have downloaded.
Step 5: Now, click on the update button to begin the update process.

Step 6: Now you will see the update process.

Step 7: Once update process is completed, select reboot to finish.
DOWNLOAD:
Xiaomi Mi 1s Android 5.0 stock ROM
Go to link download
How To Flash Update With Using PhoenixSuit Guide
How To Flash Update With Using PhoenixSuit Guide
PhoenixSuit Friend Of LiveSuit.exe
(Both Working Perfect To Allwinner Chip)
Open Your PhoenixSuit Latest Version

Click To Firmware Tab & Select Your .IMG File
Now Connect Tablet To Boot Mode , After Its Auto Started

Now Click To Yes If You Want Full Update , No For Normal Update

Same Again Click To Yes If You Want Full Update , No For Normal Update

Tablet On Update

Update Done : Enjoy
Go to link download
How To Unlock Pattern On Xiaomi Mi 2 2s
How To Unlock Pattern On Xiaomi Mi 2 2s
If you have forgotten you phone password or Pattern or you are unable to turn ON your phone than follow this few steps.
Method 1:
Step 1: Turn off your phone.
Step 2: Make sure that battery fully charge.
Step 3: Press and Hold together Volume down button + Power Button for several seconds.
Step 4: Now, you will see "No command" Press power key to see recovery menu like below image.
Step 5: Now, Select wipe data/ factory reset using Volume down key and volume up key to confirm.
Step 6: Now, Select Yes Delete All User Data using Volume down key and volume up key to confirm. (warning: your all phone data will be deleted)
Step 7: Now, wait few seconds to complete the process.
Step 8: Select Reboot System Now.
Method 2:
Step 1: Turn off your phone.
Step 2: Make sure that battery fully charge.
Step 3: Press and Hold together Volume up button + Power Button for several seconds to go to recovery mode.
Step 4: Now, Select ENGLISH using Volume down key and power key to confirm.
Step 5: Now, Select WIPE AND RESET.
Step 6: Now, Select WIPE ALL DATA. (warning: your all phone data will be deleted)
Step 7: Now, wait few seconds to complete the process.
Step 8: Select Reboot System Now.
Go to link download
How to flash Lenovo A536S stock ROM
How to flash Lenovo A536S stock ROM
Step 1: Download the Stock Rom and extract it on your Computer.
Step 2: Download Smart Phone Flash Tool on Your computer and extract it.
Step 3: Open Flash_tool.exe .
Step 4: Click on the Scatter-Loading Button from the Right.
Step 5: Now, Locate the Scatter File, you will find this file in stock ROM folder.
Step 6: Now, Click on the Download Button to begin the Flashing Process.
Step 7: Connect your Smartphone to the Computer using USB Cable. After connecting the device to the computer Press Volume Down or Volume Up key, so that your computer easily detect your phone.
Step 8: Now flashing process will start in the bottom in yellow color.
Step 9: Once Flashing is completed, a Green Ring will appear.
Step 10: Unplug USB cable from your smartphone, and swith ON your phone.
Flashing Successful
Downloads:
Go to link download
Monday, November 14, 2016
LG Flash Tool 2014 HOw To Using This Tool Guide Free Download
LG Flash Tool 2014 HOw To Using This Tool Guide Free Download

+ Build 25/06/2014 : Initial Version
+ Build 27/06/2014 : Fix not working with windows XP
+ Build 03/07/2014 : Fix not working with some machine run windows 8/8.1 64bit
2. Whats news:
+ This is a modified version of UpTestEX v1.2.3.1 and working with all LG Smartphone Models
+ Re-design GUI simpler.
+ Working without LG Mobile Support Tool installed !
+ Working with lastest version of LG Mobile Support Tool.
+ Dont need to use hosts file or run http server to bypass anymore !
+ Default language is set to English. Dont need to choose language any more !
3. Tutorial:
+ Download and setup LG Driver : Here
+ Download LG Flash Tool 2014 tool and extract :Here
+ Enter to Download Mode and plug USB into your PC
+ WARNING : Remember copy KDZ file into LG Flash Tool 2014 folder
+ Run LGFlashTool2014.exe and do as following pictures :
+ If you cannot run LGFlashTool2014.exe, please install Visual C++ Runtime Library :Here
Normal Flash: Flash ROM without losing any data. Only use this when you need to fix system error. Beware of boot loop when flashing ROM that differ from current ROM on your phone or MOD ROM.
CSE Flash: Choose this option when you need a fresh format. All data will be gone. Its suitable for upgrading or downgrading ROM or simply use this when you need to back to Stock.


No need to choose desired language, it automatically change to English as a default setting.

Lg Phone Firmware List
Go to link download
Sunday, November 13, 2016
RIFF JTAG How to repair Samsung baseband and IMEI 2
RIFF JTAG How to repair Samsung baseband and IMEI 2
Hi
This is Step By Step Guide For Repair "Null Imei" "Unknown BaseBand" "Low Signal" And All Related To EFS.....Model By Model...!!!
Supported Model List:
1-I897
2-I9000
3-I9003
4-I9070 And I9070_Modem_FS
5-I9010_Giorgio
6-I9100
7-I9100G
8-N7000
9-N7100
10-P1000
11-P6200
12-P6800
13-SPH-P100 Galaxy Tab Sprint
14-SCH-I800_Verizon
15-I9100G
16-SHW-M110s
17-N7100_Odin
18-N7100_Riff
19-I997R_Infuse_Rogers_EFS
DOWNLOAD
************************************************** ***********************
11/10/2013:
Added New EFS File With Have All Needed *.Bin File related to "Modem/Radio" and "EFS"
With This File We Can Repair Completly :
1-Null/Null Imei
2-Unknown BaseBand
3-BaseBand XXXXXXX
4-Not Registered Network(some models only)
SGH-I717
SGH-I727
SGH-I747M
SGH-I957
SGH-I957D
GT-I8150
GT-I8160
GT-I8160P
GT-I8190N
GT-I9001
GT-I9070
GT-I9105
GT-I9105P
GT-I9190
GT-I9192
GT-I9210
GT-I9500
GT-I9505
SHW-M190S
SHW-M250S
GT-N7105
GT-N8000
GT-P3100
GT-P3113
GT-P5100
GT-P5110
GT-P7320
GT-S5303
GT-S6310
GT-S6310N
GT-S6500
GT-S6500D
GT-S7500
GT-S7500L
GT-S7500T
GT-S7562
GT-S8600
SCH-I535
SCH-I535V
T879
All 40 new models can download from torrent:http://tracker.riffbox.org/details.php?id=98
How To Write:
2-Press "Load Layout From Device"
3-Find and Double Click Desired Partitions
4-Right Click One By One and Injekt *.Bin file
5-Press "Write Selected"
6-Reflash Phone With Latest Officially Firmware
Enjoy
Go to link download
How To Hard Reset BlackBerry Q10
How To Hard Reset BlackBerry Q10
HOW TO HARD RESET BLACKBERRY Q10.
Method to Hard Reset:
Step 1: Remove the battery, and then reinsert it.
Step 2: Press and hold the Power key for 10 seconds.
Step 3: Press and hold the Volume up key and Volume down key at the same time for 10 seconds.
Thats it.
Method 2:
Step 1: Press and hold the Alt key + right Shift key + Backspace/Delete key together.
Now your phone will turn off, and it will start to hard reset.
Go to link download
How to flash Xiaomi Mi 2A Stock ROM
How to flash Xiaomi Mi 2A Stock ROM
Step 1: Download Xiaomi Stock ROM on your phone from below link.
Step 2: Open Tools Folder from the Launcher and Select Updater like below image.
Step 3: Now, click on Menu Key on your Device and Select installation file.
Step 4: Locate the zip file that you have downloaded.
Step 5: Now, click on the update button to begin the update process.
Step 6: Now you will see the update process.
Step 7: Once update process is completed, select reboot to finish.
DOWNLOAD:
Xiaomi Mi 2A Android 4.1 stock ROM
Go to link download
Saturday, November 12, 2016
How to flash Lenovo A590 stock ROM
How to flash Lenovo A590 stock ROM
Step 1: Download the Stock Rom and extract it on your Computer.
Step 2: Download Smart Phone Flash Tool on Your computer and extract it.
Step 3: Open Flash_tool.exe .
Step 4: Click on the Scatter-Loading Button from the Right.
Step 5: Now, Locate the Scatter File, you will find this file in stock ROM folder.
Step 6: Now, Click on the Download Button to begin the Flashing Process.
Step 7: Connect your Smartphone to the Computer using USB Cable. After connecting the device to the computer Press Volume Down or Volume Up key, so that your computer easily detect your phone.
Step 8: Now flashing process will start in the bottom in yellow color.
Step 9: Once Flashing is completed, a Green Ring will appear.
Step 10: Unplug USB cable from your smartphone, and swith ON your phone.
Flashing Successful
Downloads:
Go to link download
How to Root Easy way Samsung SM J110F successfully Root and Unlock 100 Done
How to Root Easy way Samsung SM J110F successfully Root and Unlock 100 Done
Samsung Galaxy J1 SM-J110F Root file
Successfully Root Samsung SM-J110F for unlock and IMEI repair.Samsung SM-J110F Root File 100% Tested ok
J110FXXU0AOJ3_Pre_Rooted_v4.4.4.zip

- UNLOCK INSTRUCTIONS:
- Phone must be rooted!
- If the software cant root the phone automatically,
- then you must root your device manually.
- 1. Power on the phone.
- 2. Tap 7 times on Build number in Settings-About phone to enable Developer options,
- go to Settings-Developer options and enable USB debugging.
- 3. Connect the phone to PC with USB cable, install drivers if needed.
- 4. Press Unlock button for direct unlock or Read codes to read security codes.
.
Go to link download
Friday, November 11, 2016
How To Factory Hard Reset LG Optimus D605
How To Factory Hard Reset LG Optimus D605

Hard Reset LG Optimus D605 to Restore Factory Settings
Complete Hard Reset 100% Working Solution LG D605
Lg D605 Hard Reset Pattern lock remove LG D605 how to hard reset LG D605
Formate solution LG D605
Hard Reset LG Optimus D605 to Restore Factory Settings
LG D605 Hard Reset / Factory Reset
LG Optimus L9 II D605 hard reset
Warning! All data will be lost!
1.Power off your phone
2.Press together volume down + power key
3.Press power key to erase all data
4.Press power to confirm
5.Wait until the phone restarts
Thats it!
Go to link download
Thursday, November 10, 2016
How to flash Micromax A110 stock ROM
How to flash Micromax A110 stock ROM
Step 1: Download the Stock Rom and extract it on your Computer.
Step 2: Download Smart Phone Flash Tool on Your computer and extract it.
Step 3: Open Flash_tool.exe .
Step 4: Click on the Scatter-Loading Button from the Right.
Step 5: Now, Locate the Scatter File, you will find this file in stock ROM folder.
Step 6: Now, Click on the Download Button to begin the Flashing Process.
Step 7: Connect your Smartphone to the Computer using USB Cable. After connecting the device to the computer Press Volume Down or Volume Up key, so that your computer easily detect your phone.
Step 8: Now flashing process will start in the bottom in yellow color.
Step 9: Once Flashing is completed, a Green Ring will appear.
Step 10: Unplug USB cable from your smartphone, and swith ON your phone.
Flashing Successful
Downloads:
Go to link download
How to Karbonn a1 rooting wipe backup adb With miracle box
How to Karbonn a1 rooting wipe backup adb With miracle box
ROOTING/WIPE/ DATA RESET BACKUP ADB Done
MIRACLE BOX

NOOT ROOT & ROOTED SPD ADB

ROOTED & WIPE

BACUP ADB


 Connecting to Phone,Wait..ok
 checking info...
 Max block Space:202M sdcard Space:3.68G SD:/mnt/sdcard
 Done.
 Hardware:pz286
 Reading spl.img...(256K)
 Done.
 Reading 2ndbl.img...(512K)
 Done.
 Reading params.img...(256K)
 Done.
 Reading vmjaluna.img...(512K)
 Done.
 Reading fastboot_logo.img...(1.50M)
 Done.
 Reading productinfo.img...(2.50M)
 Done.
 Reading fixnv.img...(3.25M)
 Done.
 Reading backupfixnv.img...(3.25M)
 Done.
 Reading boot_logo.img...(3M)
 Done.
 Reading runtimenv.img...(3.25M)
 Done.
 Reading boot.img...(8M)
 Done.
 Reading recovery.img...(8M)
 Done.
 Reading system.img...(200M)
 Done.
 Reading userdata.img...(202M)
 Done.
 Reading cache.img...(60M)
 Done.
 Reading misc.img...(256K)
 Done.
 Reading modem.img...(10M)
 Done.
 Reading dsp.img...(5M)
 Done.
 Reading kpanic.img...(512K)
 Done.
>>file save to :E:CHAINAFLASH FILEKARBONNKARBONN A1+A1+_131108114246
Go to link download
Wednesday, November 9, 2016
How to flash Xiaomi Mi2 2s Stock ROM
How to flash Xiaomi Mi2 2s Stock ROM
Step 1: Download Xiaomi Stock ROM on your phone from below link.
Step 2: Open Tools Folder from the Launcher and Select Updater like below image.
Step 3: Now, click on Menu Key on your Device and Select installation file.
Step 4: Locate the zip file that you have downloaded.
Step 5: Now, click on the update button to begin the update process.
Step 6: Now you will see the update process.
Step 7: Once update process is completed, select reboot to finish.
DOWNLOAD:
Xiaomi Mi2 2s Android 4.1 stock ROM
Go to link download
How to Root Samsung J5 and J7 SM J700H v5 1 1 Lolipop Successfully Build up
How to Root Samsung J5 and J7 SM J700H v5 1 1 Lolipop Successfully Build up
Samsung J7 (SM-J700H) v5.1.1 Lolipop Root

There are many advantages of rooting, you can run special apps, 3D Games, Animation, flash a custom ROM etc. These advantages can be really useful, so if you wish to root your device then continue reading. Prerequisites. All Device you can root but liabilities depend on you.
Requerment
Download and install Samsung USB drivers in your PC.Download TWRP Recovery.
Download Odin-v3.09.
Download SuperSU package and copy the file to the internal storage of the phone.
USB Cable.
Enable USB Debugging on your device. (Settings > Developer Options > USB Debugging)
Installing TWRP Recovery
1. Download the latest Odin zip file (use version 3.09) and extract the file on your PC. You will get following files in that folder:
- Odin3 v3.09.exe
- Odin3.ini
3. Boot your Galaxy J7 into Download mode:
- Switch off your device.
- Press and hold Volume Down + Home + Power buttons together and release them once you encounter a warning screen on your device
- Press Volume Up to acknowledge the warning. This takes you to download mode.
“Added!! message will appear in Odin’s message box.
5. Now Set up Odin as follows. Odin V3.09

7. Check Auto Reboot and F.Reset Time options.
8. Now, click START button to begin the installation process.
9. After your device is rebooted you will see “PASS!” message in Odin.
Rooting your device
- Make sure your device has TWRP recovery installed.
- Download SuperSU file and copy it to your internal SD card. (Link above)
- Boot into TWRP recovery with the process described above.
- Select Install zip from SD card> Choose zip from SD card.
- Select SuperSU zip file and press yes to confirm installation.
- Now reboot your device.
After some minutes your phone will reboot. You will find your device rooted and SuperSU App installed.
You have successfully rooted Samsung Galaxy J7 with TWRP recovery installed.
Go to link download
Tuesday, November 8, 2016
How To Flash Lenovo A269i stock ROM
How To Flash Lenovo A269i stock ROM
How to flash Lenovo A269i stock ROM with SP flash tool
Step 1: Download the Stock Rom and extract it on your Computer.
Step 2: Download Smart Phone Flash Tool on Your computer and extract it.
Step 3: Open Flash_tool.exe .
Step 4: Click on the Scatter-Loading Button from the Right.
Step 5: Now, Locate the Scatter File, you will find this file in stock ROM folder.
Step 6: Now, Click on the Download Button to begin the Flashing Process.
Step 7: Connect your Smartphone to the Computer using USB Cable. After connecting the device to the computer Press Volume Down or Volume Up key, so that your computer easily detect your phone.
Step 8: Now flashing process will start in the bottom in yellow color.
Step 9: Once Flashing is completed, a Green Ring will appear.
Step 10: Unplug USB cable from your smartphone, and swith ON your phone.
Flashing Successful
Downloads:
SP Flash Tool
Stock ROM (link)
Go to link download
Monday, November 7, 2016
How to Download and Backup Facebook Profile
How to Download and Backup Facebook Profile
Also Read: How To Get More Twitter Followers Fast And Free
Social Follow and Subscription Widget For Blogger
Facebook Invite Friends Button With Timer For Blogger

Download and Backup Facebook Profile On Facebook
- Goto Facebook
- Log into your Facebook account.
- On the top right corner, click on the arrow, select Settings.

- Click on Download a copy of your Facebook Data.
- On the new page, select Start My Archive.
- When your personal archive has been generated, Youll get a notification email.
- Finally, still in your Facebook settings, click on Download Archive after the archive has been successfully generated.
Download and Backup Facebook Profile Using ArchiveFacebook
Another way of downloading and backing up your Facebook profile is using a Firefox extension that is, ArchiveFacebook. ArchiveFacebook is a free tool that allows you to save content from your Facebook account directly to your hard drive. Archive your photos, messages, activity stream, friends list, notes, events and groups. Download Firefox Extension Archive Facebook.Also Read: WhatsApp Tips and Tricks For Android 2015
How to Hide/Disable Google+ Profile Views Count
With these two methods above, you can easily download and backup your Facebook profile data.
Go to link download